Linking New Images to Old Records
This page addresses a common digitization workflow challenge: how do you link images of specimens (with new barcode numbers) to specimen records that already exist in the portal if the barcode number isn’t associated with the old data yet? Here we describe two options to solve this problem.
The following instructions assume that the barcode number is stored in the Catalog Number field, and the accession number (usually a stamped number) is stored in the Other Catalog Numbers field.
Option 1: Add catalog (barcode) numbers to occurrence records while imaging
This protocol describes how to add a barcode number to each of the specimens that you image during the imaging process.
(Example instructions for an herbarium collection)
- Acquire a specimen.
- Log in to your account and navigate to your Data Editor Control Panel (My Profile > Occurrence Management > name of collection).
- Click Edit Existing Occurrence Records.
- Place a barcode on your specimen.
- Look for a stamped number (“accession number”) on the specimen.
- If a stamped number does not exist, proceed to step 8.
- In the Record Search Form, enter the stamped number into the Other Catalog Numbers field. Do not include leading zeros (e.g., if the stamp is 01499, enter 1499). Click Display Editor.
- If no record is returned, double check that you entered the accession number correctly into the Other Catalog Numbers field and that there are no extra spaces before or after the numbers you typed. If the number is correct, contact a supervisor.
- If a record is returned, check that the data on the specimen record match the data on the label of the specimen in front of you, particularly collector, collector number, and date. i. If these data match, place your cursor in the Catalog Number field (top left) and scan the barcode of the specimen in front of you. The barcode number will then appear in this field. Press Tab on your keyboard, followed by Enter. Proceed with imaging the specimen and return to step 1. ii. If these data do NOT match, contact a supervisor.
To re-open the Record Search Form after you have performed a search, click the magnifying glass icon at the top right side of the specimen record.
- In the Record Search Form, enter the last name of the collector preceded by a percent sign (%), the collector number, and the date (in YYYY-MM-DD format) into the top three fields (see example below) and click Display Editor.
- If no record is returned, double check that you entered data correctly into the appropriate fields. If everything looks correct, contact a supervisor.
- If a record is returned, check that the data on the specimen record match the data on the label of the specimen in front of you, particularly collector, collector number, and date. i. If these data match, place your cursor in the Catalog Number field (top right) and scan the barcode of the specimen in front of you. The barcode number will then appear in this field. Press Tab on your keyboard, followed by Enter. Proceed with imaging the specimen and return to step 1. ii. If these data do NOT match, contact a supervisor.
Option 2: View new images in the portal and link by manually entering the accession number
This protocol describes how to update your old accession number with the specimen’s new barcode number. You can do this only after you have uploaded specimen images into your portal through a batch process that has created new “unprocessed” records consisting of only a barcode number and an image.
(Example instructions for an herbarium collection)
- Log in to your account and navigate to your Data Editor Control Panel (My Profile > Occurrence Management > name of collection).
- Click Edit Existing Occurrence Records.
- In the Record Search Form, click the Processing Status field and select “Unprocessed” from the dropdown menu.
- In the Custom Field 1 field, select Other Catalog Number from the first dropdown menu and IS NULL from the second dropdown menu.
- Click the “Display Editor” button.
- Locate the accession number (the stamped number, rather than the barcoded number or the collector number) on the specimen in the image to the right of the Occurrence Editor form.
- You can zoom in by pressing Command (Mac) or Control (Windows) and clicking on the image where you want to zoom in. Alternatively, you can hold Shift, click on the area where you want to zoom in, and move the mouse up (to zoom in) or down (to zoom out).
- Enter the accession number, without leading zeros (e.g., if the number reads “0145”, you will enter “145”), into the Other Cat. #s field (circled in screenshot below).
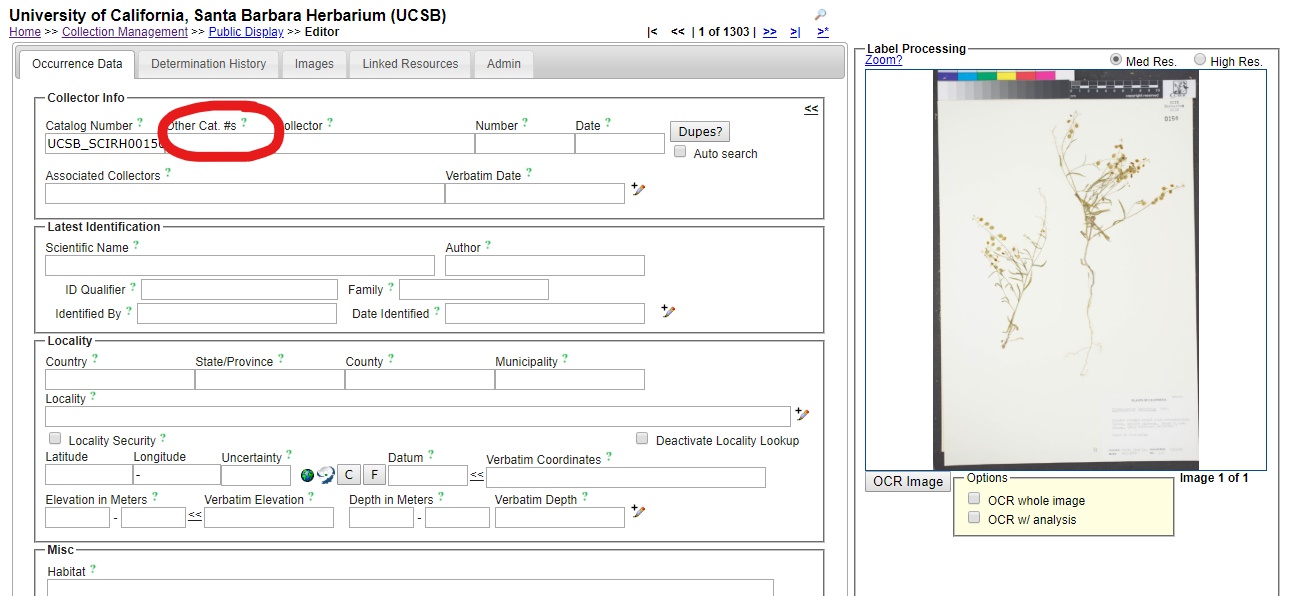
- Click outside of the Other Cat. #s field (or press the Tab button). A message should show up under the “Dupes?” button. Make sure that your browser’s pop-up blocker is disabled so you can see these messages.
- If the message shows “No Dupes Found”:
- Check that the specimen sheet is not stamped “Databased” or has any other indication that it SHOULD have a record in the database. If it is, try adding a leading zero to the accession number and repeat step 9.
- Press the Save Edits button (or press Tab and Enter on your keyboard)
- Move on to step 9.
- If a pop-up window shows up that says “Record(s) using the same identifier already exists. Do you want to view this record?”:
- Click OK.
- Check that the identified duplicate does not already have an image associated with it (if it does, you will see a bold barcode number on that record). If the duplicate does have an image already, close the window, scroll down to the Processing status field in the Curation box, select “Expert Required” from the dropdown menu, and then click the Save Edits button. Otherwise, move to step c.
- Check that the data of the identified duplicate matches the data on the label of the specimen image you were viewing. You need not check every field, just two or three important fields such as Scientific Name, Collector, and Locality.
- If the data match up, click “Merge Records” and exit the duplicate window. If the data do not match up, close the window, scroll down to the Processing status field in the Curation box, select “Expert Required” from the dropdown menu, and then click the Save Edits button.
- If the message shows “No Dupes Found”:
- Click the double arrow icon at the top right corner of the occurrence editor.
- Repeat steps 6-9.
This protocol is demonstrated in the following video:
Cite this page:
Ed Gilbert, Katie Pearson. Linking New Images to Old Records. In: Symbiota Support Hub (2025). Symbiota Documentation. https://biokic.github.io/symbiota-docs/editor/images/link/. Created on 07 Oct 2021.