Batch Georeferencing
This page describes the functionality of the Batch Georeferencing tool. Distinct protocols for georeferencing vary by institution but can utilize any of the tools described here.
- Log in to your account in the portal, click “My Profile,” navigate to the “Occurrence Management” tab, and click the name of the institution for which you will be georeferencing.
- In the Data Editor Control Panel, click “Batch Georeference Specimens.”
- Enter your desired search terms in the provided Query Form box. You can search by Country, State, County, Municiplaity, Processing Status, and/or Locality Terms. Then click Generate List.
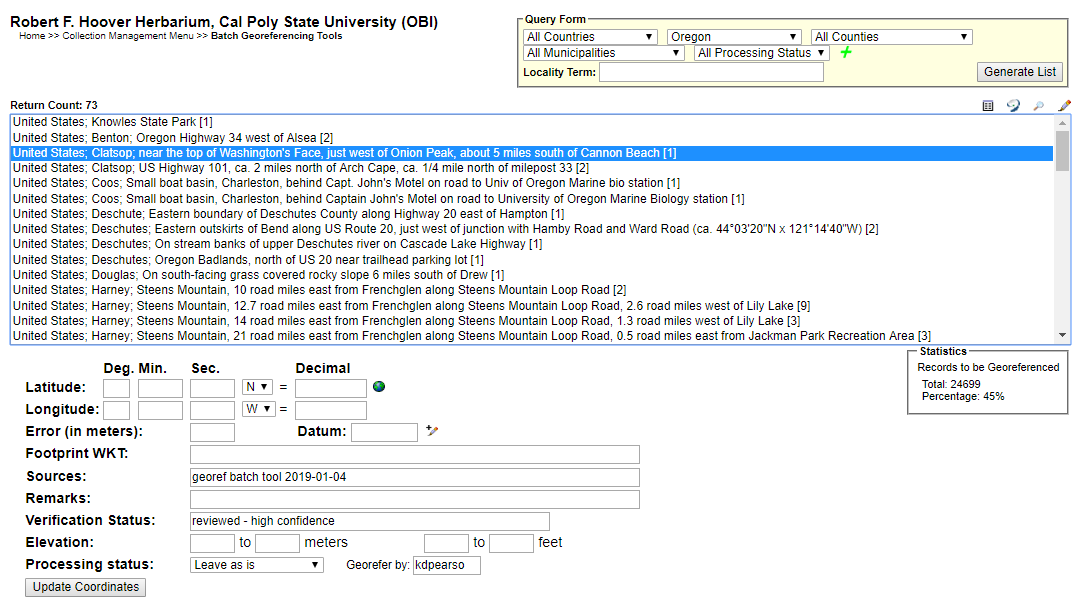
- Select the entry that you want to work on and click the Geolocate icon
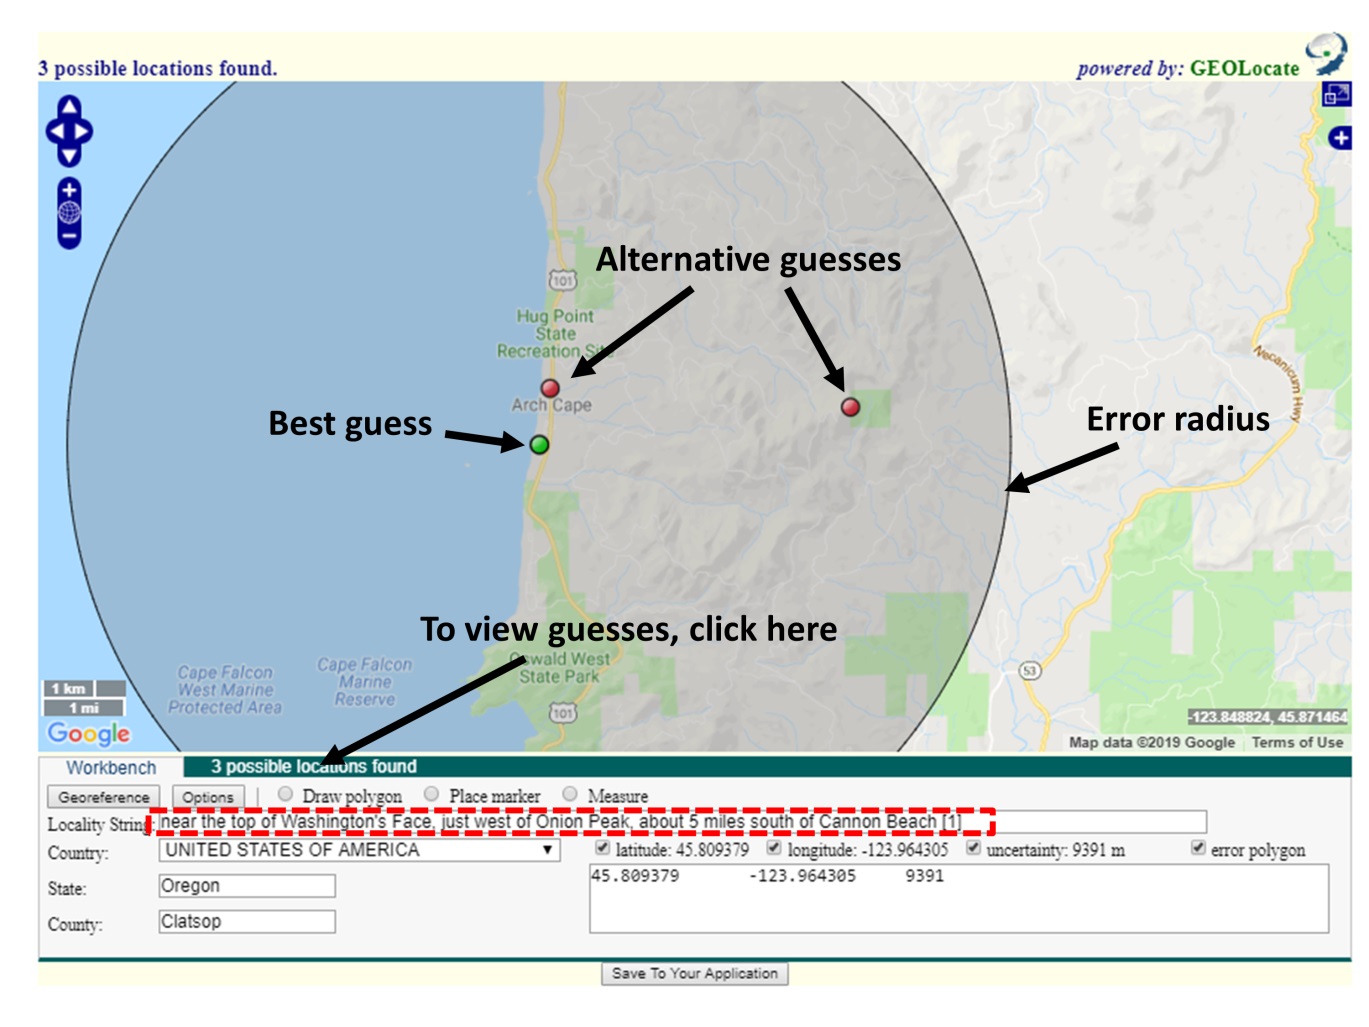
 at the top right of the search results. This will open a new GeoLocate window (see next screenshot) displaying a map and, in some cases, possible location(s) for the specimen that GeoLocate inferred from the text.
- The green dot is GeoLocate’s best guess for the locality of the specimen. You may also see red dots, which are alternative guesses.
- To view the reasons why GeoLocate selected these dots, click the “# possible locations found” tab to the right of the Workbench tab. The words in all caps are those that GeoLocate used to infer a location.
- Click the “Options” button on the bottom left of the GeoLocate window and ensure the “Do Uncertainty” box is checked. Close the Georeferencing options window.
- Make sure that all of the boxes (latitude, longitude, uncertainty, and error polygon) near the bottom right of the window are checked.
- If there are dots on the map, investigate whether any of them could be a good starting point for your georeferencing by comparing the dots’ locations on the map to the text in the Locality String (see dashed box in screenshot above). It is possible that none of the dots indicate the correct locality. If this is the case, you can ignore the dots or remove them by clicking the “# possible locations found” tab and clicking the circled ‘x’ to the left of each rejected entry (see below).
- When deciding whether to use one of the GeoLocate dots, make sure to check that the state and county where the dot has been placed matches the state and county indicated by the record.

- Either starting with a GeoLocate dot, if appropriate, or from scratch, use the Locality String to determine an approximate location for the specimen. This will likely require searching other references (e.g., Google maps) for location and feature names.
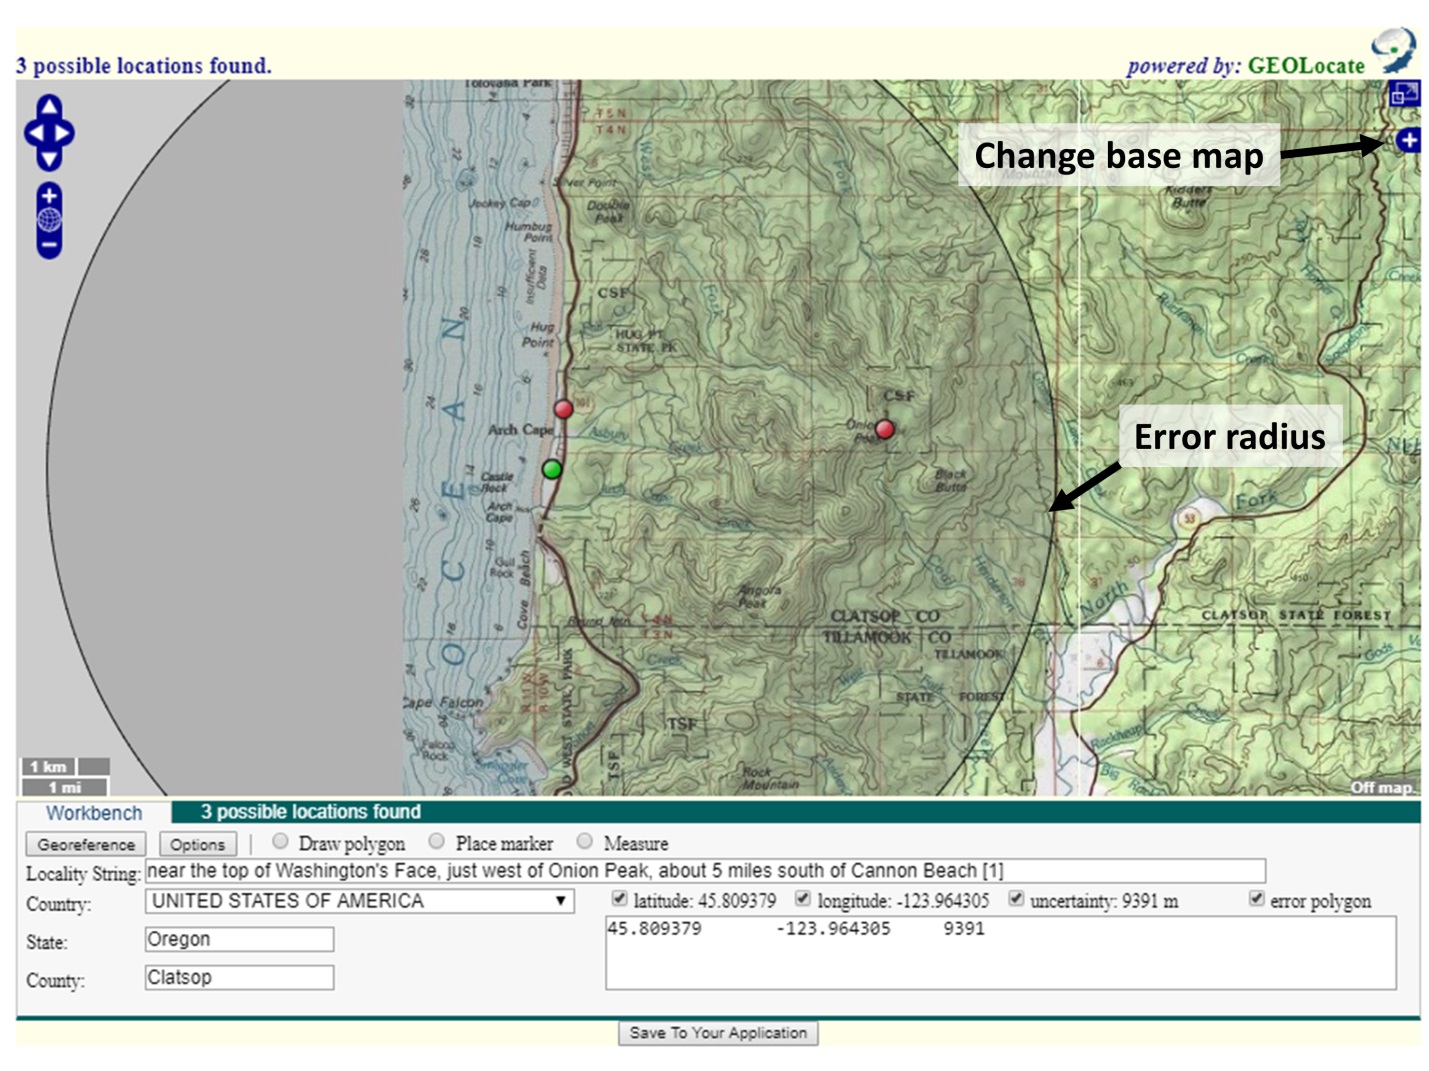
- You can change the base layer (i.e., the type of map shown in the GeoLocate window) by clicking the plus symbol in the upper right corner of the window (see next screenshot).
- To measure a distance on the map, click the button next to “Measure” and click on a starting point on the map. You can then move your cursor anywhere on the map and a line will be measured between those two points. The length of the line will be shown in green next to the line. To measure between more than one point, click again to anchor another point. To stop measuring, double click on the ending point of your measurement.
- If there is not enough information in the Locality String to assign an approximate point, view the specimen record by returning to the search results page (see screenshot below) and clicking the pencil icon on the top right of the search results box. This will bring up the specimen record, where you can see whether there is more locality information in another data field (e.g., habitat) or on the specimen image (if available).
- If you are still not able to assign an approximate point from this information, scroll down to the bottom of the specimen record until you see the Processing Status field. Select “Expert Required” from the dropdown menu of this field. In the “Notes (Occurrence Remarks)” field above and to the left, enter a brief note in brackets, such as “[Not enough data to georeference]”. Click the “Save Edits” button, close the record, and select a new record to georeference.
Once you have found an approximate location for the specimen record, click the button next to “Place Marker” and click on the map where you want to place the GeoLocate dot. We recommend using the Georeferencing Quick Guide to determine where to place the point.
Set the error radius and/or create an error polygon to indicate the uncertainty of the specimen’s locality. We recommend using the Georeferencing Quick Guide to determine how large of an error radius to use for a given point and whether you should use an error polygon.
- To edit the size of the error radius, click the green dot on the map and select “Edit Uncertainty” in the pop-up box. Click and drag the grey arrowhead that will appear on the outer rim of the error circle to resize the error radius.
- To create an error polygon, click the button next to “Create polygon” and click on the map where you want to begin drawing the polygon. A corner of the polygon will be created time you click on the map. To finish the polygon, double click. Once you have completed the polygon, click the green dot again and select “Resize uncertainty to polygon.”
- To redo a polygon, click the “Clear Polygon” button to the right of the “Options” button.
- Make sure to note any uncertainty you experienced when setting the error radius. For example, if you were georeferencing a named place that did not have clear boundaries, explain how you determined a suitable error radius by putting a note in the Remarks field on the search results page where you first selected your specimen record.

- When you are confident in your GeoLocate point and error radius, click the “Save To Your Application” button at the bottom of the GeoLocate window. You will be taken back to the search results page where you first selected your specimen record (see first screenshot).
- The coordinates and error will now show up below the search results in the appropriate Latitude, Longitude, and Error fields. If you created an error polygon, its coordinates will be listed in the Footprint WKT field.
- Click the “Update Coordinates” button at the bottom of the page.
- Select a new record or set of records to georeference from the search results list and repeat.
Example Batch Georeferencing Protocols
Cite this page:
Katie Pearson. Batch Georeferencing. In: Symbiota Support Hub (2025). Symbiota Documentation. https://biokic.github.io/symbiota-docs/editor/georeference/batch/. Created on 16 Nov 2021, last edited on 05 Feb 2024.