Restoring your Database
In the case of catastrophic database error (e.g., erroneous batch edit that cannot be easily reversed), you can replace your entire database by uploading a Darwin Core Archive (DwC-A). Note that you need to have recently downloaded a copy of your database with which you can replace your current database. To replace your database, navigate to the Administration Control Panel (My Profile > Occurrence Management > name of collection) and click “Restore Backup File” under the General Maintenance Tasks. You can then click Choose File and select a DwC-A with which to replace your dataset.
- If your DwC-A contains an “identifications” file, make sure that the “Restore Determination History” box is checked.
- If your DwC-A contains a “multimedia” file, make sure that the “Restore Images” box is checked. Click Analyze File.
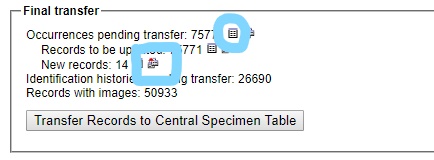
The file will take some time to load and process. Once this is done, a report called “Final transfer” will be displayed at the bottom of the screen. This report will show you how many records will be updated, how many records are new, how many identifications/determinations will be added, and how many records have images. Ensure that these numbers are as expected. You can preview these records by clicking the table icon to the immediate right of the desired dataset (circled on next screenshot), or you can download these records as a CSV by clicking the two boxes icon to the far right of the desired dataset (in a square on next screenshot). Once you are satisfied that the records will be properly uploaded, click the “Transfer Records to Central Specimen Table” button. Note that this change is permanent and cannot be undone!
Cite this page:
Katie Pearson, ed: Lindsay Walker. Restoring your Database. In: Symbiota Support Hub (2025). Symbiota Documentation. https://biokic.github.io/symbiota-docs/coll_manager/restore/. Created on 15 Dec 2021, last edited on 10 May 2024.