Redacting / Obscuring Data
This page explains how data redaction functions in a Symbiota portal.
Collection managers may wish to redact locality data for certain occurrences, for example, of rare or endangered species or for locations on private property. Locality data in Symbiota portals may be redacted in one of three ways: (a) individually (per occurrence), (b) globally (per taxon), or (c) by state.
Redacting locality data in Symbiota portals is currently binary: an occurrence can have its locality redacted (Locality Security = 1, checked) or not (Locality Security = 0, unchecked). When the Locality Security box is checked on the Occurence Editor (or Locality Security is uploaded as 1) for a given occurrence, a user who does not have Rare Species Reader or Editor permissions will not be able to view that occurrence’s:
- Locality below the level of county
- Coordinates (if provided)
- Image
How redacting data affects various users
Specimen occurrences with locality security applied affects portal users as follows:
- Administrators, Editors: all locality details are visible and can be edited on a per-collection basis
- Rare Species Readers: locality details are visible and can be downloaded, but not edited, on a per-collection basis
- All other users: no locality details are visible below county, if provided. On a record’s public view, any locality-related fields that contain obscured data will be listed in Information Withheld.
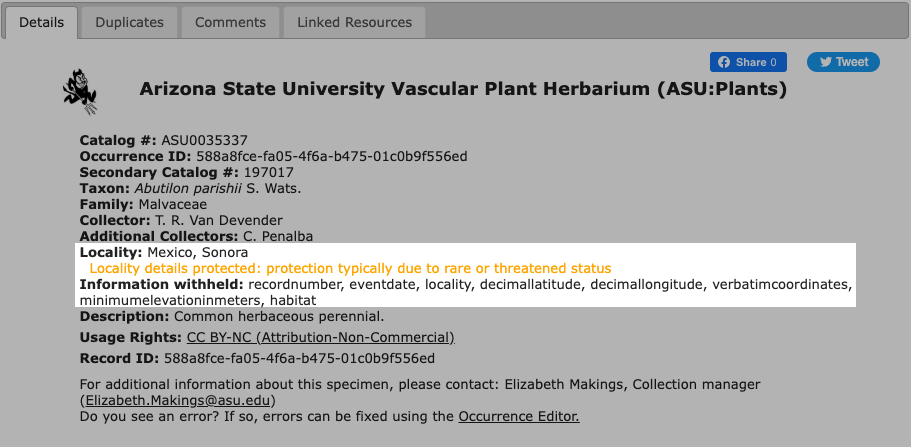
The complete list of fields that are redacted when locality security is applied includes: recordnumber, eventdate, verbatimeventdate, locality, locationid, decimallatitude, decimallongitude, verbatimcoordinates, locationremarks, georeferenceremarks, geodeticdatum, minimumelevationinmeters, maximumelevationinmeters, verbatimelevation, habitat, associatedtaxa
Users with Administrator permissions can grant or remove access to their collections data through the Administation Control Panel. Learn how here.
What taxa are protected in my portal?
The master list of Protected Species in a given portal can be viewed by all portal users, including those who are not logged into the portal.
 |
|---|
| To view all protected taxa in a portal, navigate to Sitemap > Collections > Protected Species. This example comes from SEINet. |
To query records in your collection that have location security applied, use the Data Editor Search form to construct a query where "Location Security EQUALS 1". Doing so will recall records where the location data has been obscured from public view.
How to redact data
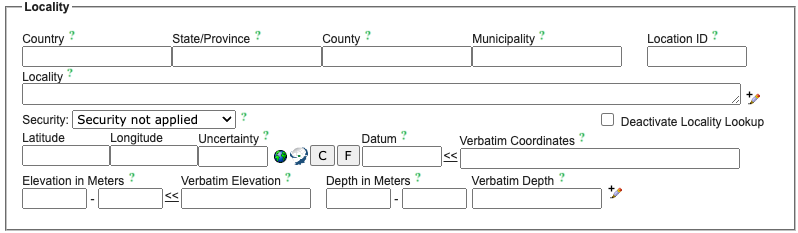
Individually redacting locality data for certain occurrences
The locality data can be redacted for individual occurrences by checking the Security box in the Occurrence Editor.
Batch redacting locality data for certain occurrences
If you wish to batch redact data, you can download a CSV file of all the specimen records you wish to redact using the Exporter tool, then add a column called “LocalitySecurity”. Enter “1” in this column for all specimens for which you wish to redact data (conversely, you would enter “0” to keep the data publicly visible, or leave this field blank). Use the Skeletal File Uploader to upload this spreadsheet into the portal, mapping the new column to localitySecurity. You may need to ask your portal manager to clear out any existing values in this field before importing via the Skeletal File Uploader.
Globally redacting locality data for certain taxa
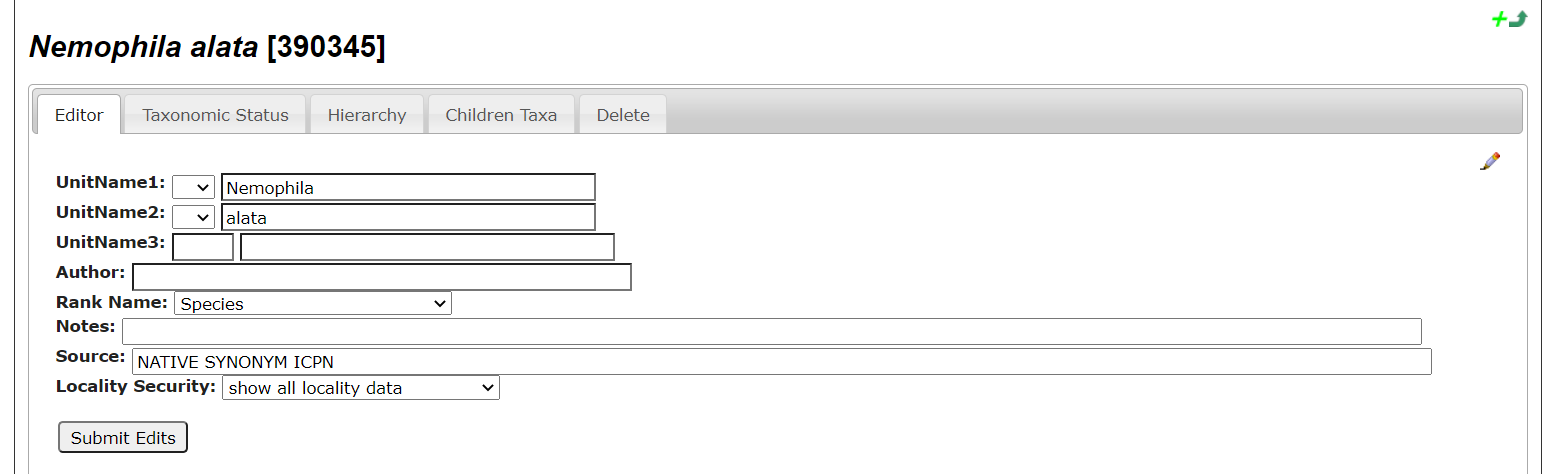
Locality data and images can be redacted for all occurrences by a specific taxon by someone with Super Administrator or Taxon Editor user permissions. To do this, find the species in the Taxonomic Tree Viewer or Taxonomy Explorer and open the editor (either by clicking on the taxon name or clicking the pencil next to the name). Change Locality Security from “show all locality data” to “hide locality data”.
This will hide locality data for all occurrences of that taxon throughout the portal, not just for your collection. Collections can opt out of this option by individually unchecking the Security box within the Occurrence Editor for individual specimen records or by contacting their portal manager for batch changes.
Redacting data by state
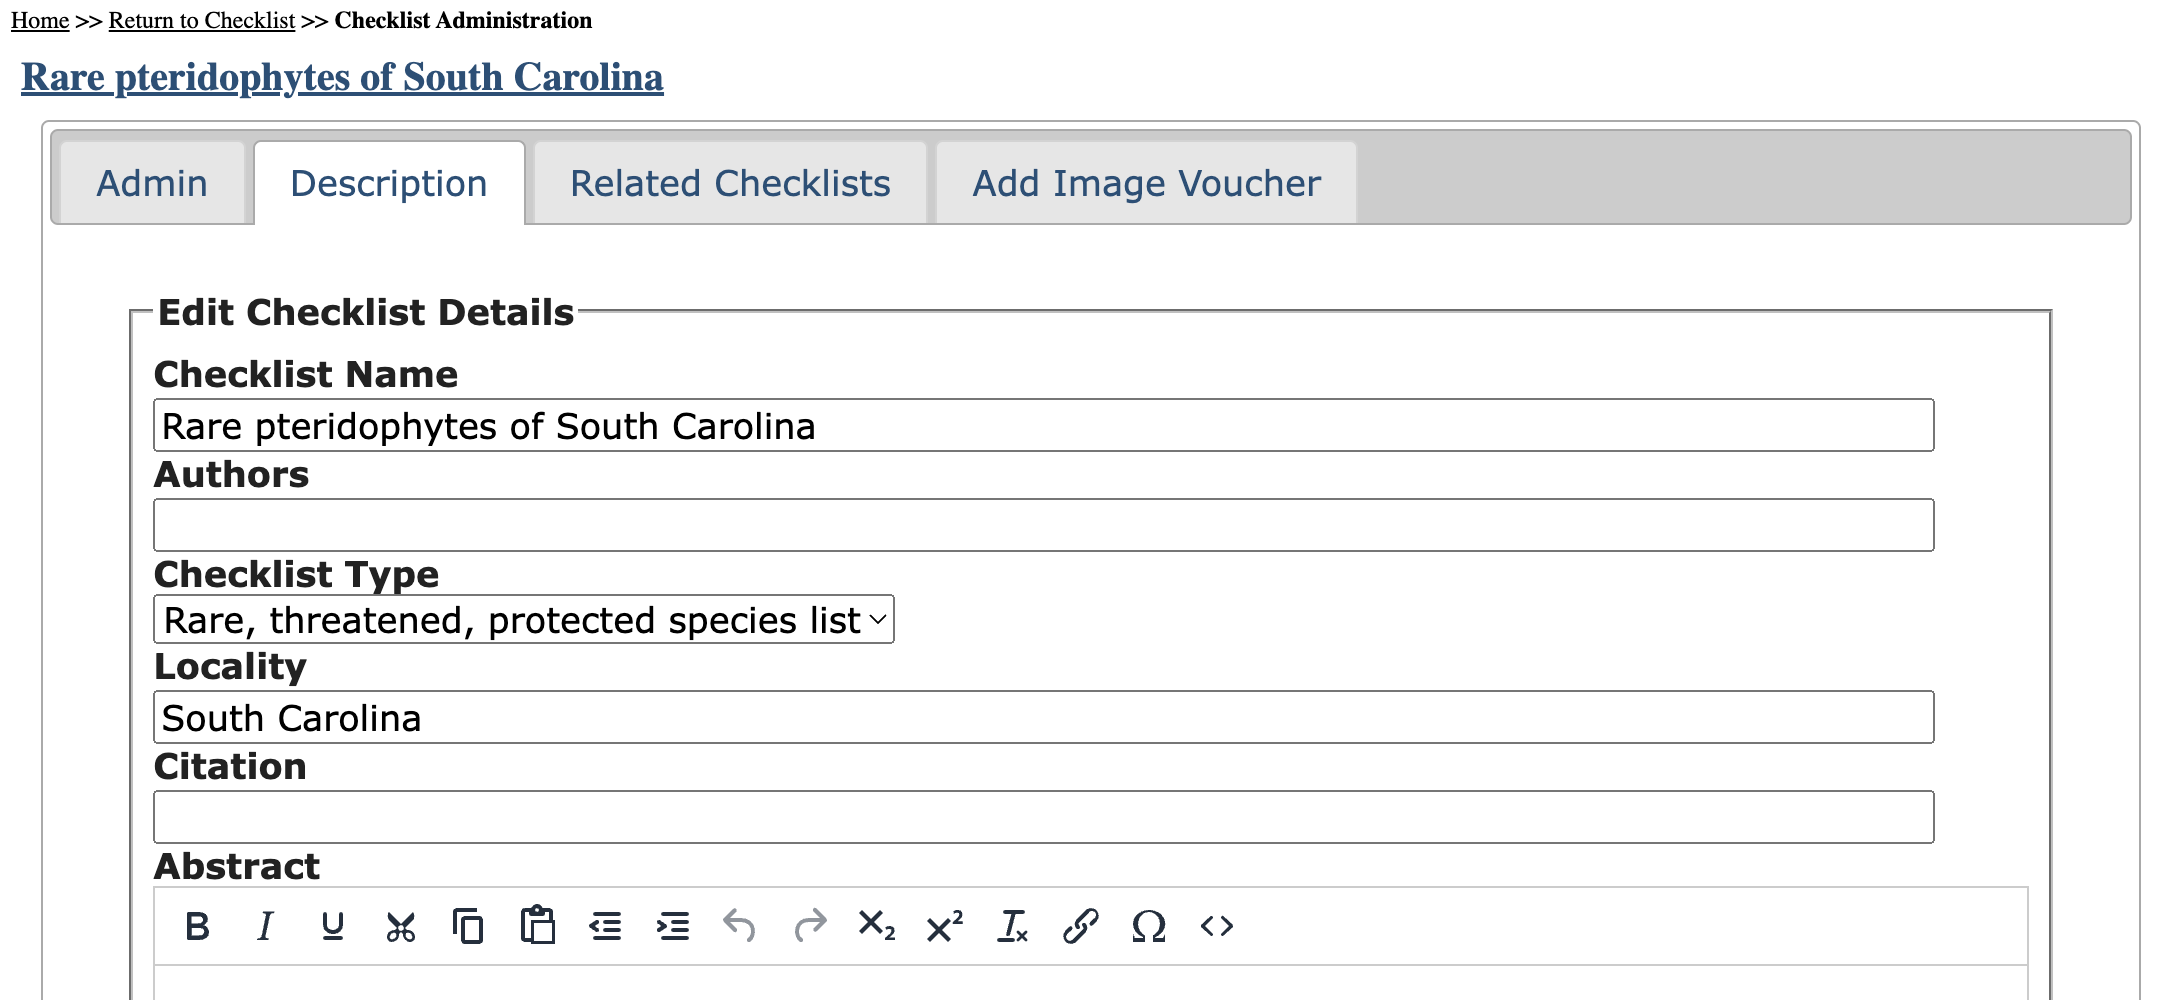
Finally, locality data and images can be redacted for occurrences of a given taxon that were collected in a certain state by managing a “Rare, threatened, protected species list”. User accounts with Rare Species Administrator permissions can create a species list specifically for managing sensitive species and then assigning editing rights to one of several appropriate users for populating and managing the state list. The addition of a species to the list will automatically protect locality details of all specimens collected within the designated state.
This will hide locality data for all occurrences of that taxon in the given state throughout the portal, not just for your collection. Collections can opt out of this option by individually unchecking the Security box within the Occurrence Editor for individual specimen records or by contacting their portal manager for batch changes.
Will my redacted data be visible if published to GBIF?
By default, no. Keep the box, “Redact Sensitive Localities”, in the Darwin Core Archive Publisher checked so that redacted data will remain obscured when a Darwin Core Archive file is sent to GBIF. To locate the Darwin Core Archive Publisher, navigate to Administration Control Panel > Darwin Core Archive Publishing. Scroll down to the “Create/Refresh Darwin Core Archive” box.
Keep in mind that the Security field must contain a value of “1” for your data to be successfully redacted within the portal, as well as during data publishing; this applies to both live-managed and snapshot collections. If Security is blank, your data will remain visible and can be published.
Instructions for creating state-based redacted species lists
Create a new empty rare species checklist.
- Click “My Profile”, select the Species Checklists tab, and click the green plus sign.
- Change the Checklist Type to “Rare, threatened, protected species list”. If you don’t see the Checklist Type field located below the author field, then you do not have the necessary Rare Species Administrator permissions to create this type of checklist. In this case, you can continue creating the checklist (as normal) and ask a portal manager to change the checklist type at a later date.
- Enter the state name in the locality field. Do not abbreviate or add any other text other than the state name.
- The checklist can be private or public and made available to the general public.
Add one to several checklist editors to the checklist.
- From the new checklists, click on the checklist administration editing pencil located towards the user right of the page
- Checklist editors do not need Rare Species Administrator or any other special editing rights to manage the list
Checklist editors add species needing protection using the normal checklist editing tools.
- See checklist tutorials for help creating and managing checklists.
How users can request access to redacted data
Individuals who require access to redacted data for legitimate reasons are encouraged to directly reach out to the contact(s) listed on collections profiles to acquire data access. However, if the request is complex and requires contacting numerous collections, individuals can contact the Symbiota Support Hub for assistance in reaching out to the relevant collections. Please keep your collection’s contact information up to date so that portal users and the Support Hub can contact you about these requests. It is also recommended that you add hub@symbiota.org to your own contacts so these messages are not blocked by an institutional firewall or routed to spam.
Related Resources
Cite this page:
Katie Pearson, Ed Gilbert, ed: Lindsay Walker. Redacting / Obscuring Data. In: Symbiota Support Hub (2025). Symbiota Documentation. https://biokic.github.io/symbiota-docs/coll_manager/data_publishing/redaction/. Created on 01 Nov 2021, last edited on 14 Mar 2025.